Thursday, June 20, 2013

Reaper - Crufty Midi theme


If you have been following along, drop the below in your current theme "rtconfig.txt" ... or download here crufty_midi.ReaperThemeZip

This probably will be it for me and  Reaper v4 / midi for a while...


;-- Crufty Begin ----------------
Layout "crufty_midi"
;Remove un-needed items
clear tcp.pan
clear tcp.pan.*a
clear tcp.io
clear tcp.io.*
clear tcp.recmon
clear tcp.recmode
clear tcp.phase
clear tcp.recinput
clear tcp.recinput.*
clear tcp.recarm
clear tcp.io
clear tcp.meter
clear tcp.meter.*
clear tcp.volume
clear tcp.volume.*
clear tcp.width
clear tcp.width.*
clear tcp.fxin
clear tcp.fxin.*
; 2x2 configuration "tall"
; grid_00 grid_01
; grid_10 grid_11

set grid_00 [ 20  0 16 16 0 0 0 0 ]
set grid_01 [ 36  0 16 16 0 0 0 0 ]
set grid_10 [ 20 16 16 16 0 0 0 0 ]
set grid_11 [ 36 16 16 16 0 0 0 0 ]

  ; 1x4 configuration "short"
; col1 col2 col3 col4
set col1 [ 20 4 16 16 0 0 0 0 ]
  set col2 [ 36 4 16 16 0 0 0 0 ]
set col3 [ 52 4 16 16 0 0 0 0 ]
set col4 [ 68 4 16 16 0 0 0 0 ]
set tcp.size h<32 [340 24] [340 32]
set tcp.margin [ 0 0 0 0 ]


;trackidx 
set tcp.trackidx w<50 [0] [ 0 2 20 20 0 0 0 0 ]

;mute & solo
;              |--short-------|  |--tall-----|
set tcp.mute h<32 w<132 [0] col1 w<116 [0] grid_00

;              |--short-------|  |--tall-------------------|
set tcp.solo h<32 w<132 [0] col2 w<116 [0] w<132 grid_10 grid_01

;vst & envelopes
set tcp.fx  h<32 w<148 [0] col3 w<132 [0] grid_10
set tcp.env h<32 w<148 [0] col4 w<132 [0] grid_11

; track label
set tcp.label h<32 w<132 w<51 w<25 [ 0 0 24 24 0 0 0] [ 0 0 340 24 0 0 1 0 ] [ 20 0 144 24  0 0 1 0  ] w<148 [ 52 0 112 24 0 0 1 0 ]  [ 84 0 80 24  0 0 1 0 ] w<116 [ 20 0 144 32  0 0 1 0  ] w<132 [ 36 0 128 32  0 0 1 0  ] [52 0 112 32  0 0 1 0 ] 

; what tcp.label is doing:
; h <32
; w<25:  label only (vert):  [ 0 0 24 24 0 0 0]
; w>25, w<51: label only (horiz): [ 0 0 340 24 0 0 1 0 ]
; w>51, w<132: 2 buttons only: [ 20 0 144 24  0 0 1 0  ]
; w>132, w<148: 4 buttons only: [ 52 0 112 24 0 0 1 0 ]
; w>148: 4 buttons + params: [ 84 0 80 24  0 0 1 0 ]
; h>32
; w<116 i forgot!!!
; w<132 yup doing something here
; w>=132 not sure anymore

;                               |-- add fxparm.w to label.w ----|  
set tcp.label tcp_fxparms==0 + [ 0 0 160 0 0 0 0] tcp.label w<324 + [ 0 0 160 0 0 0 0]  tcp.label     
set tcp.label.margin [ 2 2 0 0 0 0.5 ]
set tcp.label.font [ 0 ]
set tcp.label.color [ 102 255 255 0   0 255 255 0 ]
; fx paras
set tcp.fxparm tcp_fxparms==0 [0] w<324 [0] [ 164 0 160 32 1 0 1 1 ]
set tcp.fxparm.font [1]
set tcp.fxparm.margin [ 0 0 0 0 0]
; hide folders when super narrow
set tcp.foldercomp w<50 [0] [ 324 0 16 16 1 1 1 1]
set tcp.folder w<50 [0] [ 324 10 16 16 1 1 1 1]

Layout "crufty_midi_vst"
set tcp.fxin tcp.fx
clear tcp.fx
EndLayout 
EndLayout
;-- Crufty End ------------------

Wednesday, June 19, 2013

State of Crufty - Midsummer night's dream, 2013

State of the Crufty

Earlier this year, Ableton finally released Live 9.  I was in the 'suite' pre-order bundle, so my Live came w/Max 4 Live.  That's what I'm using today, and I am always discovering little workflow ehancements--great stuff! 

The lack of sysex is kind of a drag.

The shift off Reaper 4.3

I had spent quite a bit of time setting up a Reaper template, I was loathe to shift off. I had built a custom midi oriented theme, setup all my patch lists. *sigh*  The timing seemed tight.  BUT i was having mondo issues actually controlling my synths.  How do I send CCs?

Reaper's midi plugin is kinda crappy. Actually, a whole lot of crappy.  Only 5 ccs?  That will never do!

So I installed Ctrlr. woww...the workflow killed me.  I spent 3 weeks trying to get a custom Jomox 999 module--all cc mind you--and I couldn't really get it to work inside of reaper.   I'm sure it was operator error.

So I back burnered my ctrlr+reaper  stuff.  Ctrlr is a great alternative, however I was getting frustrated. I know its "in between" right now, and open source guys deserve all the credit for the change they bring.  So no complaints about ctrlr nor reaper...I know reaper's not open source, but the prices is $60 for what amounts to almost unlimited upgrades.  Cheaper then beers w/buddies!

Shift onto Live 9

Live 9 included Max 4 Live (M4L).  I didn't bother with a manual...who needs that?  I downloaded an Orbit 9090 M4L module and took a look.  Hmm...not to scrappy!  I actually was able to figure out how to use M4L w/some poking about. Props!  Definitely a mature environment.

I set about creating panels for all my synths! Nice! Actually works pretty well.

Workflow Today

Today, I use live as a midi sequencer.  I'm not very good at recording, so I have one audio track and I record everything in real time to that first cell.

After I record a jam, i drop the resultant wav into Reaper, where I have a master bus fxchain preset I apply.  I render to wav, then drop the resultant wav in "Max" to convert to mp3.  Convoluted, I know, but..it works.  My workflow is really smooth and I'm afraid to change!  I can bang out an idea in under an hr or two.  No wires, just two power switches and a default template. 

Do have one gripe about Live--forgetting my Midi channel settings each time!

I'm still tweaking the masterbus chain.  I want something fire and forget: time is at an essence!  

Promise to myself

I have promised myself no more sample packs, no more plugins--not unless plugs help w/ master bus. No plugins w/dongles, that is for sure.  

Future Posts

Before I forget...

1. My current HW setup
2. Making Max4Live Midi Devices, including a python script to convert Reaper patch lists into something I can copy and paste into M4L
3. My current live setup
4. Reaper FX Chain


Saturday, February 16, 2013

Current Crufty Midi Theme

Current state of crufty "midi" oriented theme

Full view
When track panel is wide enough, it shows patch selection parameters, various common midi items (envelope / cc automation etc) --  got rid of all the audio nonsense (see track 1).  I put all the buttons on the left so they are in a "common" spot, regardless of the width of the track panel.

Condensed view 
When the track view is narrow enough, we hide more of the buttons--unless the track is tall enough to include a narrow row.


Narrow View
When the track is very narrow--we display ONLY the label.  I would like to get the label to render vertically (like the moog)...but so far, no luck!

Theme is getting closer to completion...next up! button bars.


Saturday, February 2, 2013

Crufty_Midi: A midi specific mod to the Default Reaper Theme

In the previous post, I setup a a custom "crufty_midi" theme for me to use in Reaper.

Theming in Reaper is fairly straightforward; I'll edit a text file "crufty_midi.ReaperTheme" first and connect to our custom images folder--just in case.  Then i'll edit an "rtconfig.txt" file and add a custom track layout for myself (We still have the unchanged, default theme present in case I goof up).

I'll select my theme from inside Reaper, and each time I make edits, reselect.

The engine that Reaper uses for theming is called "WALTER".  Anytime we see "WALTER" in the context of Reaper, we should think of this "crufty_midi.ReaperTheme" text file, and any associated images/files.

1. Getting started: essential WALTER Links

White Tie "Themer's Guide "Tutorial

A Reaper user has posted an awesome tutorial for WALTER theming...read this first!  This http://www.houseofwhitetie.com/reaper/walter_themers_guide.pdf

Official WALTER syntax

The Reaper www site has the official WALTER syntax:
http://www.reaper.fm/sdk/walter/walter.php

Official WALTER Forum

The Reaper forums are very friendly and a great resource:
http://forum.cockos.com/forumdisplay.php?f=26

I won't be covering WALTER 101 stuff--the above links will be way more up to date.

2.  Open crufty_midi.ReaperTheme

Very few edits will be made to the .Re
First, we navigate to the ColorThemes folder and double click on crufty_midi.ReaperTheme

If this is the first time we are trying to open a ReaperTheme file, OSX may not know what to do with it.  I use the TextEditor because I too lazy to install a "better" editor, though I am sure there are better options.


2.  Set ui_img to "crufty_midi"

I find the setting for "ui_img" and ensure it knows about our image subfolder. Not sure if this is strictly necessary:

ui_img=crufty_midi

I save--and quit.   This is edit for edits to the crufty_midi.ReaperTheme file!

3. Open up rt_config.txt

Next, I descend into the crufty_midi subfolder and double click on the rt_config.txt file.  This will open the "WALTER" syntax file in TextEdit, and allow me to make mods in ernest!


Again--I'm sure there are 'better' text editors...this is just what i use.

A. Add a crufty_midi layout

Inside of  rt_config.txt there are a whole host of options, settings, and finite-state-machine flotsam and jetsam.  If the rt_config.txt seems alien at first--do not despair!  We can compartmentalize our mod almost entirely, so that we gain all the benefit of our default theme, and don't have to learn the WALTER syntax to the n'th degree.

First, we go and find where the walter init ends and the CockOs default theme begins.

Next, we add our little crufty_midi track layout.


I save. As long as I keep all my mods in between the comments 'Crufty Begin' / 'Crufy End' have a very simple way to 'upgrade' my mod with new themes as they come out.


B. Basic Theme Desires

Rather then go into the syntax of the crufty_midi theme--I'll post the actual theme on the Reaper stash (a place for files to be shared with the rest of the reaper community) so folks can download and inspect as they desire.

Instead, I'll talk about what I want from my theme:

First, the default theme is "too bulky". 

For Midi oriented tracks, I need only Mute, Solo, FX (for vst controls) and envelopes.  I also need VST "FX" parameters, so that I can pick patches directly from the track itself.   I don't need any i/o, volume, pan, or 'audio' related misc stuff.  These can all be found on the vertical "mixer" layout.   

Next, I want the label last, not first.  I want the buttons all on the left--and the parameters to the right of the label.  I want it all to "shrink" reasonably,  with buttons disappearing as we run out of column space.

I guess a list will help--what is important to display, in order?
  1. Track Number
  2. Folder compress/uncompress
  3. Track Name
  4. Mute & Solo
  5. FX Window & Envelope Display
  6. VST "FX" Parameters (esp important for bank/patch selection via ReaControlMidi)

Hmm..thinking about it, I want everything displayed in a single row when the track height is small.

I never really have tall track heights--but I can see where I might want more horizontal space w/out sacrificing buttons. So if my track height is < 32 pixels, all buttons will be on a single row.  But, if the track height is >32 pixels, I'll want buttons oriented in a 2x2 grid,w/a taller label.

C. Layout Pseudo Code

In my mind, I determine the layout will be structured:
  1. Hide & clear all unused elements (io, vol, pan, etc)
  2. Create positional macros for the buttons (2x2 grid vs single row)
  3. Place track index
  4. Use the height & width of the panel to determine the x, y, w, h of the first four buttons (mute, solo, fx, envelope)
    1. Hide buttons based on panel width
    2. Use panel height to determine grid or row positioning
  5. Next we'll plop the label, using panel width to determine x positioning--the label x will have to shift based on the number of buttons visible
    1. If parameters aren't visible, the label width will have to be longer
  6. Parameters (if there) will be last, and only if there is room.
  7. Finally the folder button.
How will I know where to place eveything?  I basically have two categories of use cases: short (<32 and="" pixels="" tall="">=32 pixels).

Use Cases

In the short category, I'll have three display cases:
  1. Completely minimal--label only
  2. Mute & Solo & Label only, all in a row
  3. Everything

In the tall category, I'll have three equivalent display cases:
  1. Completely minimal--label only
  2. Mute & Solo & Label only, with mute and solo above/below each other
  3. Everything
Ideally it would be cool to generate the positional information programmatically.  However, to do so, we'll need the "-" operator--and walter doesn't know how to subtract. It only knows how to add and multiply.   True, a - b = a + 1 * - b, but this is an extra layer of complexity we don't need.

So instead, I'll use Apple's Numbers spreadsheet to determine the x,y,w,h layout.

4. Numbers

The Numbers document I make will be used to copy and paste widget positions into the rtconfig.txt file.  I'll use the Numbers document to programmatically determine widget layout, vs trying to do it inside rtconfig.txt via Walter--it's just easier for me this way.

Widget Dimensions

First, I create a table "Gui Sizes" of basic dimensional information:

Short 

Next, I create the three uses cases for short -- i want everything in a row. So where will all the widgets go?

Note:

The final "everything" use case table has our panel width--340.  to make our life really easy, I have found it important to make sure all our setups fit within this same width.

So our first two use cases have a gap calculation, which we add to the label width--this makes sure all our panel layouts will have the same dimension.

Tall

Do the same thing for the tall uses cases:

Notice how the X/Y of the 2x2 grid is different.

Summary

In the WALTER logic, I'll need to figure out when to show and hide buttons and where to stick the label--this is different for tall vs short use cases.  So I make a summary table:

finally! Done with the widget positioning.  By using references and various formulas, I can tweak the dimensions, and simplify the walter logic--just need to remember to copy and paste everything :)

The Numbers "tables" used are:


Thats it for now!  In my next post I'll add show how to use the theme and where I'll go from here.

Custom Themes in Reaper, OSX

Custom Themes in Reaper (OSX)

I usually stick with default themes; in my experience, custom themes usually degrade with time...a release comes out, the original developer no longer has time, the audience isn't quite sure how to maintain.

In the case of Reaper, I have found that track layouts are really oriented around sound / recording sound. 

MIDI isn't quite the focus. I don't need inputs, pan, volume, or any of the more recording oriented buttons that one might use.  So I decided to create a mod to the default theme.

Setup:
Non-Retina MacBook Pro (i7)
OSX 10.8 (Mountain Lion)
Reaper 4.32


1. Themes are stored in the Color Themes folder

Open up a finder window, and from your "home" folder, navigate to:
 ~/Library/Application Support/Reaper/ColorThemes


2. Duplicate the default reaper theme

I am opting to use the default theme as the basis for my mod...but really any mod would do.

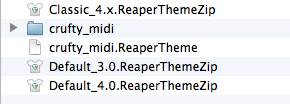
I select Default_4.0ReaperThemeZip, Copy (⌘C) and Paste  (⌘V).


3. Rename duplicated theme to .zip

Now that we have a copy of the default theme, we need to modify it!  A theme file is just a zip, so we need to unzip.  First, I rename Default_4.0 copy.ReaperThemeZip to crufty_midi_temp.zip


4. Open .zip file, rename & move contents to ColorThemes folder

Once renamed as a zip fie, I double click on the zip file to 'unpack' the theme folder--this will create a crufty_midi_temp folder. 


 Inside the crufty_midi_temp folder, we find the 4.0 theme we're going to use as the basis for our tweaks.


To reduce conflicts--and I'm not sure if this is required,  but its what I did--I rename the Default_4.0_unpacked folder to crufty_midi.  Default_4.0_unpacked.ReaperTheme gets renamed to crufty_midi.ReaperTheme.

Next, I cut (⌘X) both these items, navigate to the parent Color Themes Folder, and paste (⌘V).  I delete the crufty_midi_temp folder, as well as the crufty_midi_temp.zip file--these are no longer needed.

Done! I now have a baseline for any theme mods I need to make!  I can edit crufty_midi.ReaperTheme in TextEdit to my hearts content.


Tuesday, January 29, 2013

OSX and Reaper -- Prep

Reaper and OSX

After using Ableton ITB for a while, I have decided to setup a mini rack for hw fun.  

Ableton Live 8 can't do sysex

Live is a great tool, but does not have any capacity for sysex.  Can't record, can't transmit. Since most of my rack is older rack gear that is almost all sysex based, Live is out. Which breaks my brain to no end--I LOVE LIVE!  It is a great creative tool.  

Cubase is the consensus best of breed for midi hw

I would like to use Cubase, but I have to wait a bit for going that route.  I'm not really feeling Logic--I've used Logic for a while and it has its issues w/sysex too.  Will it be supported by Apple? I have no idea--seems like it has been ages since it's gotten an update.

I haven't used Digital Performer since v5.  I like DP but I also had my issues with DP,  right mouse clicks and other stuff.  

So...CockOs Reaper. Originally a windows only release, now on a Mac.  Can I dig it?

Preparing for Reaper

Before I dive into reaper--need to make sure my system is up to snuff.  And that means, showing my Library--open up ye olde Terminal and type...

chflags nohidden ~/Library/

that's it! Now I'm ready for Reaper (I have a fully authorized license btw).  I download, install and authorize.


Sunday, May 27, 2012

Kontakt Sample Manager - Sample Builder Script


GNU License applies, please don't sell w/out contacting me first. Feel free to share, use, change as your heart's desire.

Copy and paste the script below.  I called it "crufty_sample_builder"


{*** BEGIN COPY ***}

{*** (C) Crufty 2010                                                  ***}
{*** First Iteration, release 11/20/2010                              ***}
{*** GNU License, free for personal use, contact me for anything else ***}


{***


To prep for use:
open up mapping editor
drag and drop all samples into mapping editor
edit, select all zones
move each zone to its own group (empty)
set krange c-2  to g8
root C3


***}


on init
{*** UI Setup ***}


make_perfview

declare $max_sample
$max_sample:=$NUM_GROUPS


{*** Mute Buttons ***}
declare ui_switch $sample_1_mute
set_text ($sample_1_mute,"Mute")
make_persistent($sample_1_mute)
read_persistent_var($sample_1_mute)
move_control($sample_1_mute,1,1)

declare ui_switch $sample_2_mute
set_text ($sample_2_mute,"Mute")
make_persistent($sample_2_mute)
read_persistent_var($sample_2_mute)
move_control($sample_2_mute,2,1)

declare ui_switch $sample_3_mute
set_text ($sample_3_mute,"Mute")
make_persistent($sample_3_mute)
read_persistent_var($sample_3_mute)
move_control($sample_3_mute,2,1)


declare ui_switch $sample_4_mute
set_text ($sample_4_mute,"Mute")
make_persistent($sample_4_mute)
read_persistent_var($sample_4_mute)
move_control($sample_4_mute,2,1)


{*** Sample Select Knobs ***}
declare ui_knob $sample_1(0,$max_sample,1)
set_text ($sample_1, "Sample")
make_persistent($sample_1)
read_persistent_var($sample_1)
move_control($sample_1,1,2)


declare ui_knob $sample_2(0,$max_sample,1)
set_text ($sample_2, "Sample")
make_persistent($sample_2)
read_persistent_var($sample_2)
move_control($sample_2,2,2)


declare ui_knob $sample_3(0,$max_sample,1)
set_text ($sample_3, "Sample")
make_persistent($sample_3)
read_persistent_var($sample_3)
move_control($sample_3,3,2)


declare ui_knob $sample_4(0,$max_sample,1)
set_text ($sample_4, "Sample")
make_persistent($sample_4)
read_persistent_var($sample_4)
move_control($sample_4,4,2)


{*** Pitch Knobs -- Set to midpoint if 0 ***}
declare ui_knob $sample_1_pitch(1,1000000,1000000/127)
set_text ($sample_1_pitch, "Pitch")
make_persistent($sample_1_pitch)
read_persistent_var($sample_1_pitch)
move_control($sample_1_pitch,1,4)
if ($sample_1_pitch=0)
$sample_1_pitch:=1000000/2
end if


declare ui_knob $sample_2_pitch(1,1000000,1000000/127)
set_text ($sample_2_pitch, "Pitch")
make_persistent($sample_2_pitch)
read_persistent_var($sample_2_pitch)
move_control($sample_2_pitch,2,4)
if ($sample_2_pitch=0)
$sample_2_pitch:=1000000/2
end if


declare ui_knob $sample_3_pitch(1,1000000,1000000/127)
set_text ($sample_3_pitch, "Pitch")
make_persistent($sample_3_pitch)
read_persistent_var($sample_3_pitch)
move_control($sample_3_pitch,3,4)
if ($sample_3_pitch=0)
$sample_3_pitch:=1000000/2
end if


declare ui_knob $sample_4_pitch(1,1000000,1000000/127)
set_text ($sample_4_pitch, "Pitch")
make_persistent($sample_4_pitch)
read_persistent_var($sample_4_pitch)
move_control($sample_4_pitch,4,4)
if ($sample_4_pitch=0)
$sample_4_pitch:=1000000/2
end if


{*** Global Pitch ***}
declare ui_knob $global_pitch(1,127,1)
set_text ($global_pitch, "Glbl Pitch")
make_persistent($global_pitch)
read_persistent_var($global_pitch)
move_control($global_pitch,5,4)
if ($global_pitch=0)
$global_pitch:=64
end if


{*** sample group level ***} 
declare ui_slider $sample_1_level(1,1000000)
move_control($sample_1_level,1,6)
make_persistent($sample_1_level)
read_persistent_var($sample_1_level)


declare ui_slider $sample_2_level(1,1000000)
move_control($sample_2_level,2,6)
make_persistent($sample_2_level)
read_persistent_var($sample_2_level)


declare ui_slider $sample_3_level(1,1000000)
move_control($sample_3_level,3,6)
make_persistent($sample_3_level)
read_persistent_var($sample_3_level)


declare ui_slider $sample_4_level(1,1000000)
move_control($sample_4_level,4,6)
make_persistent($sample_4_level)
read_persistent_var($sample_4_level)


end on


{*** UI Controls ***}


on ui_control ($sample_1_pitch)
set_engine_par($ENGINE_PAR_TUNE,$sample_1_pitch,$sample_1,-1,-1)
end on


on ui_control ($sample_2_pitch)
set_engine_par($ENGINE_PAR_TUNE,$sample_2_pitch,$sample_2,-1,-1)
end on


on ui_control ($sample_3_pitch)
set_engine_par($ENGINE_PAR_TUNE,$sample_3_pitch,$sample_1,-1,-1)
end on


on ui_control ($sample_4_pitch)
set_engine_par($ENGINE_PAR_TUNE,$sample_4_pitch,$sample_1,-1,-1)
end on


on ui_control ($sample_2_level)
set_engine_par($ENGINE_PAR_VOLUME,$sample_2_level,$sample_2,-1,-1)
end on


on ui_control ($sample_1_level)
set_engine_par($ENGINE_PAR_VOLUME,$sample_1_level,$sample_1,-1,-1)
end on


on ui_control ($sample_3_level)
set_engine_par($ENGINE_PAR_VOLUME,$sample_3_level,$sample_3,-1,-1)
end on


on ui_control ($sample_4_level)
set_engine_par($ENGINE_PAR_VOLUME,$sample_4_level,$sample_4,-1,-1)
end on


on note
change_note($EVENT_ID,$global_pitch)


disallow_group($ALL_GROUPS)


if ($sample_1_mute=0)
allow_group($sample_1)

end if 


if ($sample_2_mute=0)
allow_group($sample_2)
end if 


if ($sample_3_mute=0)
allow_group($sample_3)
end if 


if ($sample_4_mute=0)
allow_group($sample_4)
end if 


end on


{*** Change Log ***}
{*** 2010/11/20 Initial Release                   ***}
{*** END COPY ***}