Monday, June 24, 2013

Perl Scripts in OSX

Perl Scripts in OSX

Scripting is an "easy" way to get things done.   OSX has Automator, which is a great tool.  However, sometimes it's just easier to do certain text processing in other scripting languages.  The three "greats" are Perl, Python and Ruby.

When it comes to lazy, homegrown text manipulation, I like using tiny bits of Perl.  Well, for Terminal stuff.

All of what follows is intended, eventually, to run from the Terminal or an automator.


Organization: Create a Perl folder

The key to automation is organization.   Keep things separate, keep things simple, and our job of remembering stuff gets a lot easier!

In finder, I created a Projects folder under Documents.  In Projects, I created a Perl folder. 


Add new Perl Folder to your .profile

Now that we have created a folder to hold all our perl scripts, we want to make our lives easier and do some stuff that will allow us to run any file -- in this perl folder -- from any location in a Terminal session. 


First, run TextEdit (or your favorite text editor)...


First, check to see if you have a .profile already--you probably do not.  But just in case, File -> Open, navigate to your "Home", then press  Command + Shift + . to see all .dot files.   IF you see a .profile, then you will want to edit that file...very carefully I might add!

I was surprised to find I did not have a .profile.  So I cancelled out of the File Open dialog and created a new document. 

First things first--when editing "UNIX" style files, remember to change the "RTF" style document to a plain text document! Format -> Make Plain Text
  
Next, we are going to append to a system variable called "PATH".   PATH is used to tell Terminal sessions where commands exist.  Any folder in the PATH will be searched when running commands from a Terminal session.  So by adding our new Perl folder to the path, we'll be able to run our perl scripts from anywhere on our mac.

If you already have a .profile--be careful!  modifying an existing .profile is beyond the scope of this blog post.  Hopefully if you have a .profile, you know what you are doing!

I did not have a .profile, so I simply typed in:

export PATH="$PATH:~/Documents/Projects/Perl"

Notice the double quotes!  Very important.


Finally, lets save.  When saving, we will want the filename to be ".profile", the directory to be our home, and we will want to save w/out a .txt extension!  When prompted, confirm that yes we want tp use ".".  


When running terminal, in commands keyed into this /.profile file will be automatically executed.  There is all kinds of neat stuff one can do! However, I like to keep things simple and vanilla.  I'm sure there is an OSX way to "get-et-done", but whatever...

Create our first Perl script

now, once again, lets create a new document in Text Edit.  As usual--Make Plain Text.  Save, and when saving, uncheck "if no extension is provided, us .txt" checkbox.  I called this script "hello.pl"...and remember, I need to save it in 

The first line tells our Terminal session what kind of script we're running--so for Perl, the script needs to start with: #!/usr/bin/perl

after that...all our perl commands!  In this case, something simple...

print "Hello world!\n";

exit 0;


Setting up our script

Finally! Done w/TextEdit.  First, launch terminal.

Once in terminal, lets change directories to our Perl folder!

$ cd Documents/
$ cd Projects/
$ cd Perl/

Once there...lets add execute permissions to our perl script!

$ chmod a+x hello.pl


Running our script

From any directory in Terminal, key in hello.pl, and our program will run!

$ hello.pl


Recap: Creating Perl Scripts


  1. Create a "Plain Text" file -- usually ending in .pl 
  2. First line of file reads #!/usr/bin/perl
  3. Make file executable via chmod a+x
Phew!  Seems like a lot right?  Well...not really.  Lets find out why in a future post, as use a perl script to convert Reaper ReaBank's to something we can paste into a Max4Live objects.


Saturday, June 22, 2013

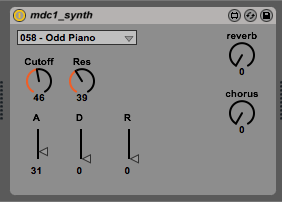
Ableton Live - Roland MDC-1 Synth Controller

Max 4 Live - MDC1 Synth Controller


Sending NNRPN messages via M4L  -- not sure this is the canonical way.

Relevant bits of the Roland MDC-1 manual:


Thursday, June 20, 2013

Reaper - Crufty Midi theme


If you have been following along, drop the below in your current theme "rtconfig.txt" ... or download here crufty_midi.ReaperThemeZip

This probably will be it for me and  Reaper v4 / midi for a while...


;-- Crufty Begin ----------------
Layout "crufty_midi"
;Remove un-needed items
clear tcp.pan
clear tcp.pan.*a
clear tcp.io
clear tcp.io.*
clear tcp.recmon
clear tcp.recmode
clear tcp.phase
clear tcp.recinput
clear tcp.recinput.*
clear tcp.recarm
clear tcp.io
clear tcp.meter
clear tcp.meter.*
clear tcp.volume
clear tcp.volume.*
clear tcp.width
clear tcp.width.*
clear tcp.fxin
clear tcp.fxin.*
; 2x2 configuration "tall"
; grid_00 grid_01
; grid_10 grid_11

set grid_00 [ 20  0 16 16 0 0 0 0 ]
set grid_01 [ 36  0 16 16 0 0 0 0 ]
set grid_10 [ 20 16 16 16 0 0 0 0 ]
set grid_11 [ 36 16 16 16 0 0 0 0 ]

  ; 1x4 configuration "short"
; col1 col2 col3 col4
set col1 [ 20 4 16 16 0 0 0 0 ]
  set col2 [ 36 4 16 16 0 0 0 0 ]
set col3 [ 52 4 16 16 0 0 0 0 ]
set col4 [ 68 4 16 16 0 0 0 0 ]
set tcp.size h<32 [340 24] [340 32]
set tcp.margin [ 0 0 0 0 ]


;trackidx 
set tcp.trackidx w<50 [0] [ 0 2 20 20 0 0 0 0 ]

;mute & solo
;              |--short-------|  |--tall-----|
set tcp.mute h<32 w<132 [0] col1 w<116 [0] grid_00

;              |--short-------|  |--tall-------------------|
set tcp.solo h<32 w<132 [0] col2 w<116 [0] w<132 grid_10 grid_01

;vst & envelopes
set tcp.fx  h<32 w<148 [0] col3 w<132 [0] grid_10
set tcp.env h<32 w<148 [0] col4 w<132 [0] grid_11

; track label
set tcp.label h<32 w<132 w<51 w<25 [ 0 0 24 24 0 0 0] [ 0 0 340 24 0 0 1 0 ] [ 20 0 144 24  0 0 1 0  ] w<148 [ 52 0 112 24 0 0 1 0 ]  [ 84 0 80 24  0 0 1 0 ] w<116 [ 20 0 144 32  0 0 1 0  ] w<132 [ 36 0 128 32  0 0 1 0  ] [52 0 112 32  0 0 1 0 ] 

; what tcp.label is doing:
; h <32
; w<25:  label only (vert):  [ 0 0 24 24 0 0 0]
; w>25, w<51: label only (horiz): [ 0 0 340 24 0 0 1 0 ]
; w>51, w<132: 2 buttons only: [ 20 0 144 24  0 0 1 0  ]
; w>132, w<148: 4 buttons only: [ 52 0 112 24 0 0 1 0 ]
; w>148: 4 buttons + params: [ 84 0 80 24  0 0 1 0 ]
; h>32
; w<116 i forgot!!!
; w<132 yup doing something here
; w>=132 not sure anymore

;                               |-- add fxparm.w to label.w ----|  
set tcp.label tcp_fxparms==0 + [ 0 0 160 0 0 0 0] tcp.label w<324 + [ 0 0 160 0 0 0 0]  tcp.label     
set tcp.label.margin [ 2 2 0 0 0 0.5 ]
set tcp.label.font [ 0 ]
set tcp.label.color [ 102 255 255 0   0 255 255 0 ]
; fx paras
set tcp.fxparm tcp_fxparms==0 [0] w<324 [0] [ 164 0 160 32 1 0 1 1 ]
set tcp.fxparm.font [1]
set tcp.fxparm.margin [ 0 0 0 0 0]
; hide folders when super narrow
set tcp.foldercomp w<50 [0] [ 324 0 16 16 1 1 1 1]
set tcp.folder w<50 [0] [ 324 10 16 16 1 1 1 1]

Layout "crufty_midi_vst"
set tcp.fxin tcp.fx
clear tcp.fx
EndLayout 
EndLayout
;-- Crufty End ------------------

Wednesday, June 19, 2013

State of Crufty - Midsummer night's dream, 2013

State of the Crufty

Earlier this year, Ableton finally released Live 9.  I was in the 'suite' pre-order bundle, so my Live came w/Max 4 Live.  That's what I'm using today, and I am always discovering little workflow ehancements--great stuff! 

The lack of sysex is kind of a drag.

The shift off Reaper 4.3

I had spent quite a bit of time setting up a Reaper template, I was loathe to shift off. I had built a custom midi oriented theme, setup all my patch lists. *sigh*  The timing seemed tight.  BUT i was having mondo issues actually controlling my synths.  How do I send CCs?

Reaper's midi plugin is kinda crappy. Actually, a whole lot of crappy.  Only 5 ccs?  That will never do!

So I installed Ctrlr. woww...the workflow killed me.  I spent 3 weeks trying to get a custom Jomox 999 module--all cc mind you--and I couldn't really get it to work inside of reaper.   I'm sure it was operator error.

So I back burnered my ctrlr+reaper  stuff.  Ctrlr is a great alternative, however I was getting frustrated. I know its "in between" right now, and open source guys deserve all the credit for the change they bring.  So no complaints about ctrlr nor reaper...I know reaper's not open source, but the prices is $60 for what amounts to almost unlimited upgrades.  Cheaper then beers w/buddies!

Shift onto Live 9

Live 9 included Max 4 Live (M4L).  I didn't bother with a manual...who needs that?  I downloaded an Orbit 9090 M4L module and took a look.  Hmm...not to scrappy!  I actually was able to figure out how to use M4L w/some poking about. Props!  Definitely a mature environment.

I set about creating panels for all my synths! Nice! Actually works pretty well.

Workflow Today

Today, I use live as a midi sequencer.  I'm not very good at recording, so I have one audio track and I record everything in real time to that first cell.

After I record a jam, i drop the resultant wav into Reaper, where I have a master bus fxchain preset I apply.  I render to wav, then drop the resultant wav in "Max" to convert to mp3.  Convoluted, I know, but..it works.  My workflow is really smooth and I'm afraid to change!  I can bang out an idea in under an hr or two.  No wires, just two power switches and a default template. 

Do have one gripe about Live--forgetting my Midi channel settings each time!

I'm still tweaking the masterbus chain.  I want something fire and forget: time is at an essence!  

Promise to myself

I have promised myself no more sample packs, no more plugins--not unless plugs help w/ master bus. No plugins w/dongles, that is for sure.  

Future Posts

Before I forget...

1. My current HW setup
2. Making Max4Live Midi Devices, including a python script to convert Reaper patch lists into something I can copy and paste into M4L
3. My current live setup
4. Reaper FX Chain